Overview
Documents setting up code, config, and data in a development environment using Eclipse.
Prerequisites
- Git client
- Java 7 installed
- Mysql 5.5 or 5.6 installed
- Maven 3.2.+ installed
- Tomcat 7 installed and configured
- Eclipse
- Use version 4.4 (Luna) - J2EE edition
- m2e (the maven integration for eclipse - download from the market place)
- m2e-egit connector
- eGit - http://eclipse.github.com/
- Jautodoc - import configuration from Code and XML Formatting in Eclipse
- ObjectAid UML Diagram tool for class hierarchy visualization. Installed via Help->Install New Software. Instructions athttp://www.objectaid.net/installation
- FindBugs (static code analysis)
- AngularJS - see https://github.com/angelozerr/angularjs-eclipse/wiki/Getting-Started
As this project is organized around Maven and may make use of resources on IHTSDO Nexus, properly configure your Settings.xml Page.
Details
Step 1 - Create directories
Setup for Windows
- Create a directory to hold your data files (e.g. c:/mapping/data)
- Create a directory to hold your config files (e.g. c:/mapping/config)
- Create a directory to hold the code (e.g. c:/workspace/OTF-Mapping-Service)
- Make sure the "mvn" executable for your local maven installation is in the path
- On Windows this means adding to the PATH variable so that it runs in a "cmd" shell without fully qualified path.
Setup for Unix/Linux/Mac
- Create a directory to hold your data files (e.g. ~/data)
- Create a directory to hold your config files (e.g. ~/config)
- Create a directory to hold the code (e.g. ~/code)
- Make sure the "mvn" executable for your local maven installation is in the path
Step 2 - Clone repositories
Clone the Github repository to the directory created to hold the code.
Step 3 - Build project
Build all project modules with "mvn clean install" at the top level - either through Eclipse or via the command line.
- NOTE: this uses the standard "dev-windows" configuration. To use a different configuration artifact pass the following three parameters:
- -Dconfig.groupId=...
- -Dconfig.artifactId=...
- -Dconfig.version=...
- NOTE: the specified configuration artifact must either have been built locally or be an a repository accessible based on the settings.xml file
- NOTE: index viewer data is similarly configured. Stock config files reference release versions of index viewer data hosted on https://nexus3.ihtsdotools.org. Consider adding this as an extra repository in your settings.xml
- For most dev deployments, the default build is fine because the only setting really used for the rest/webapp packages is the "base.url" which by default is set to http://localhost:8080/mapping-rest.
- For a UAT or production deployment, you would want to use a different setting. For example, see Deploy Instructions, the prod deployment instructions.
Step 4 - Setup Configuration
Choose a "dev-windows", "uat", or "prod" config project target and unzip it into the directory created to hold your config files.
- config/dev-windows/target/mapping-config-dev-windows.*.zip
- config/prod/target/mapping-config-prod.*.zip
- config/uat/target/mapping-config-uat.*.zip
Step 5 - Edit configuration
Edit the "config.properties" file in your config files directory to set correctly for your environment. In particular, edit these:
- javax.persistence.jdbc.url
- javax.persistence.jdbc.user
- javax.persistence.jdbc.password
- hibernate.search.default.indexBase ( recommend choosing something in your data dir, e.g. c:/mapping/data/indexes or ~/indexes)
- mail.smtp.to (list for automated system emails)
- send.notification.recipients (list for automated tools, like reports generation and database qa)
Step 6 - Create database
Create a MySQL UTF8 database. e.g.
CREATE database mappingservicedb CHARACTER SET utf8 default collate utf8_unicode_ci;
Step 7 - Load data
Download and unpack the data file (mapping-demo.zip) into your data directory (e.g. c:/mapping/data):

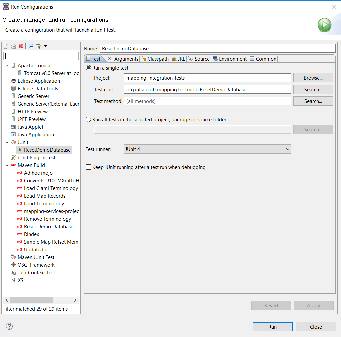
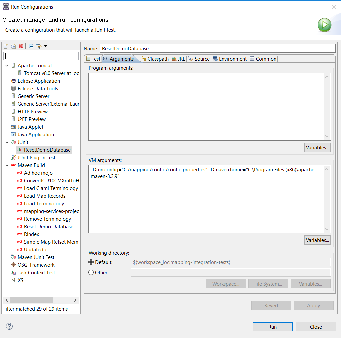
Run the "Reset Demo Database" integration-test. You must specify 3 parameters:
- run.config=c:/mapping/config/config.properties
- skipTests=false
- maven.home=c:/apache-maven-3.3.9
See images below to set up a JUnit run configuration that will generate your demo database.
Step 8 - Deploy wars
Deploy the mapping-rest.war file to a Tomcat server - either through Eclipse or a standalone tomcat installation.
Setting up Tomcat in Eclipse is very easy, you follow these steps.
- Download and install apache tomcat 7 in c:/apache-tomcat-XXXX
- In Eclipse use the J2EE perspective and click on the "Servers" tab.
- From here, you can add a server which simply involves pointing Eclipse to the Tomcat install directory.
- You can right-click on term-server-rest.war file and use "Run As->Run on Server" to deploy to Tomcat.
- NOTE: sometimes in Eclipse this doesn't work and the tomcat does not properly recognize or deploy the app.
- In this event, double-click on the tomcat server installation in the servers tab.
- In the configuration screen click "Open launch configuration"
There, look on the Arguments tab and find the -D setting for "catalina.base", e.g.
-Dcatalina.base="C:\Users\Brian Carlsen\workspace-luna\.metadata\.plugins\org.eclipse.wst.server.core\tmp0"- If you open this directory you'll see a "webapps" folder. To deploy you simply build and copy the war files to that directory and launch the server in Eclipse.
The Tomcat server needs to be able to find the configuration file from step 3. Double-click on the Tomcat server you installed, open the launch configuration and add this setting to the "Arguments" tab:
-Drun.config=/path/to/your/config.properties
Step 9 - Test
Check that it all works by going to
http://localhost:8080/mapping-rest/index.html
This should be the login page for the application. If you have security disabled, you should be able to log in using a username and matching password of 'lead1' or 'specialist1' or any of the usernames listed in the config.properties file.
References/Links