Overview
Documentation on application features for specialists.
Specialist Features
These features are available to specialists in addition to the General features.
Finding available work
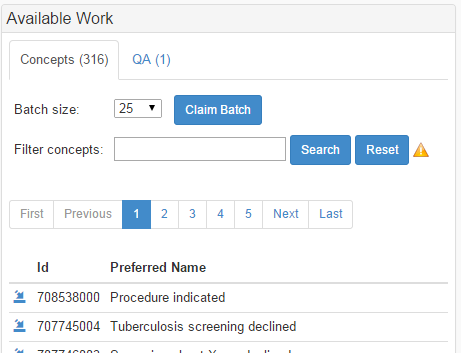
From the specialist dashboard, the features supports finding content that needs to be worked according to one of two tabs:
- Concepts - in scope unmapped work
- QA - failed QA checks that have not yet been reviewed
The list of available work can be searched/filtered or paged through. Assigning work is done by clicking at the "Claim" icon to the left of each entry. Batches of up to 100 concepts can also be claimed by using the "Claim Batch" button.
Assigning work
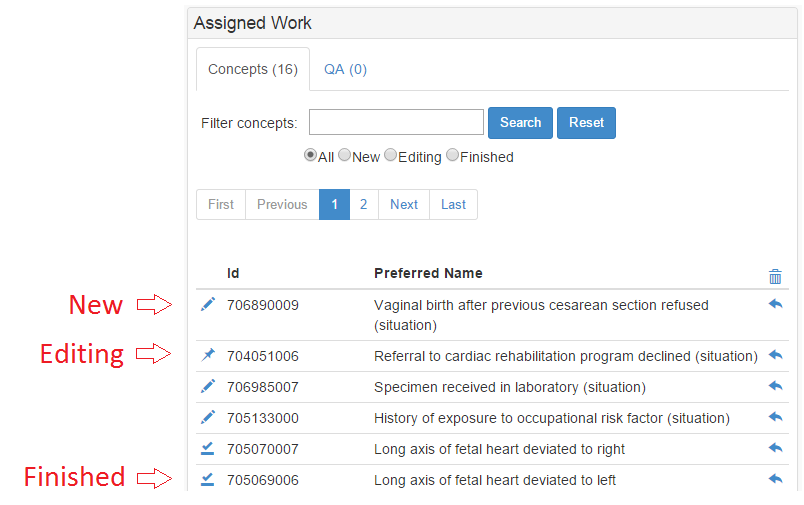
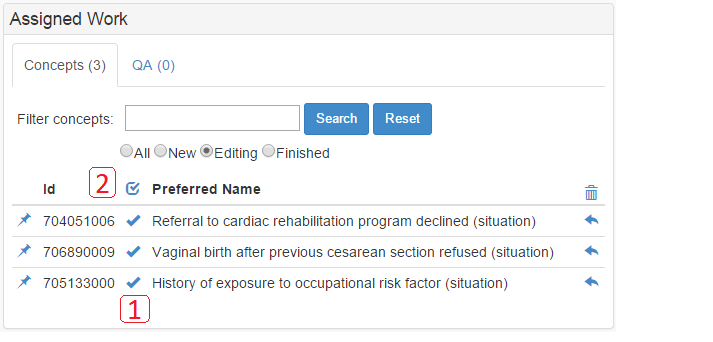
Assigned work fits into the same two categories as available work for a specialist. Once assigned work can be edited by clicking on the icon to the left of each entry. Clicking on the icon to the right will return work back to the pool for assignment. Concepts can also be searched/filtered and paged from this view. There are four radio buttons for seeing assigned work in different stages of the SPECIALISTs workflow
- All - all assigned work of this type
- New - assigned work that has not yet been started.
- Editing - assigned work that is still being edited
- Finished - assigned work that is done but has not yet been submitted for the next workflow review.
For New, Editing, and Finished work, the state of work performed to date is indicated by the type of icon to the left of each entry:
- New: A pencil icon
- Editing: A pushpin icon
- Finished: An underlined checkmark icon
Editing assigned work
To edit assigned work, click the icon to the left of the record. The tool will display the map record editing dashboard. A labeled screenshot is shown below, with descriptions of each component below the screenshot.
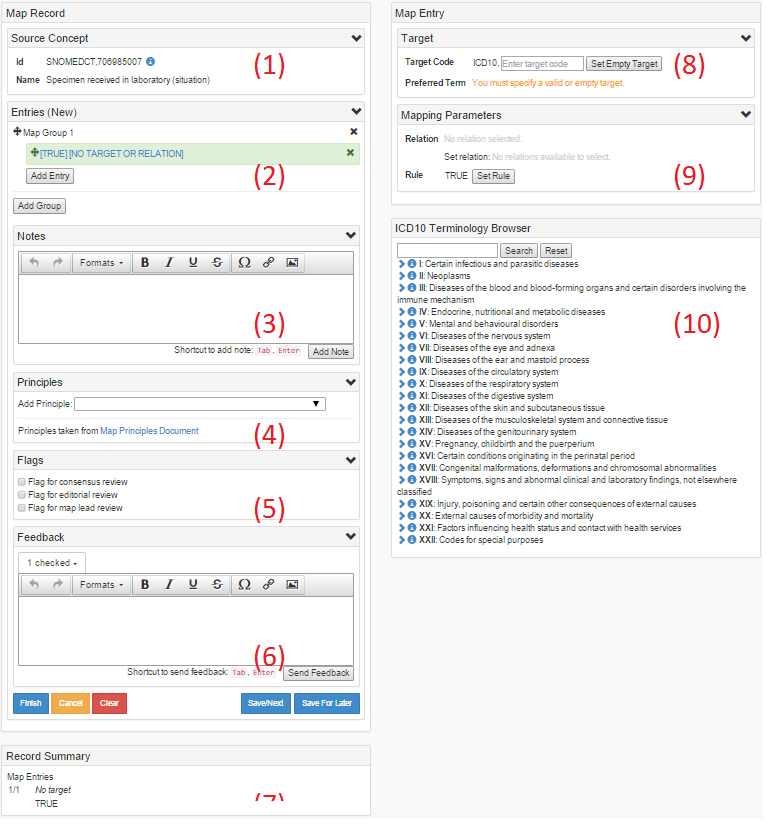
- Source Concept Details Panel
- Displays the source terminology, concept id, and concept name.
- If the source terminology is SNOMEDCT, a blue information icon is displayed. Clicking this opens the SNOMEDCT Concept Browser
- If the destination terminology is ICD10 (or another terminology with loaded indexes), a blue book icon is displayed. Clicking this opens the Index Viewer.
- Map Group and Map Entries Panel
- Displays a summary current map entries attached to the record, sorted by group. The entry currently being edited is highlighted in green.
- To add a map group or entry, click the Add Entry/Group buttons.
- Entries and groups can be deleted by clicking the "x" icon attached to the desired element. Note that deleting a group will also delete all of its entries.
- Entries and groups can be reordered by drag-and-drop.
An example of multiple groups and entries is shown below, with the current entry highlighted in green.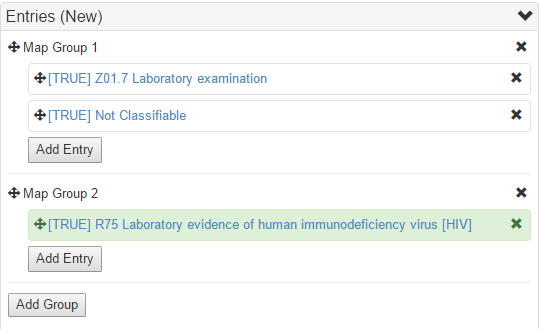
- Map Notes Panel
- Displays any notes currently attached to the record. Notes can be deleted by clicking the "x" icon on the desired note.
- To add notes to the record, enter some text into the rich text editor and click "Add Note".
- Note can be entered directly or copied and pasted from external sources such as websites or MS Word documents, with formatting preserved. This editor supports the following elements:
- Basic formatting (bold, italics, underline)
- HTML elements (e.g. <p>, <div>, anchor tags, hyperlinks)
- HTML image elements hosted on another website/server

- Map Principles Panel
- Displays any principles currently attached to the record. Principles can be deleted by clicking the "x" icon on the desired note.
- Principles can be added from the drop-down box, with displayed principles taken from the hyperlinked document.
An example of an applied principle is shown below.
- Flags Panel
- To flag a record for review, simply click the checkbox.
- The three currently supported flags are Consensus Review, Editorial Review, and Lead Review.
- Feedback Panel
- Displays any communication between the user and anyone else involved in a discussion about this record.
- To submit new Feedback to one or more leads attached to the project, enter text and click "Send Feedback".
- Feedback can be formatted in the same ways Map Notes can (see #3)
- Record Summary Widget: Displays a summary of the current state of the record as edited.
- Target Panel:
- Displays the currently selected target code and Preferred Term for the selected map entry (highlighted in green in #2)
- To change the target, enter the target code into the text box and click "Set Target".
- If the entry has no target, this must be explicitly indicated by clicking "Set Empty Target" when the text box is empty
- Mapping Parameters Panel:
- Displays the map relation, map advices, and map rule for the selected map entry (highlighted in green in #2)
- Only those parameters appropriate to the current project are displayed. For example, if the project is not rule-based, the "Rule" row and button will not appear.
- If map relations are available for this project and selected target, a drop-down menu will appear with those relations valid for assignment.
An example of an assigned relation with drop-down options is shown below.
- To set the rule (for a rule-based project), click the "Set Rule" button. A modal pop-up will prompt for the Rule Category and any required parameters. Click "Add Rule" to finish setting the rule.
An example of using the Rule Constructor to set a chronological age requirement is shown below.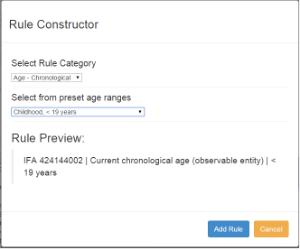
- If Map Advices are available for this project and selected target, a drop-down picklist will appear with those advices valid for assignment. Advice can be added by simply selecting the desired item in the drop-down box. Advice can be removed by clicking the "x" icon on the displayed advice values.
An example of advices attached to the entry is shown below.
- Terminology Browser Panel
- Displays a nested-tree structure representing the target terminology.
- The terminology browser has three major components, which are marked in the screenshot below.
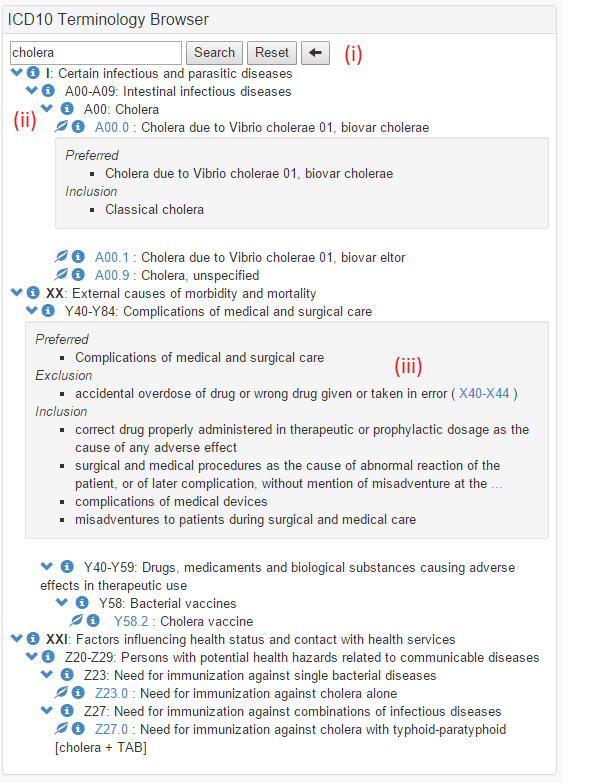
- Search Tools
- To perform a search, enter text and hit Enter or "Search". The tree will change to reflect only those nodes (and parents) that match the search terms.
- To reset the search, hit "Reset". The tree will revert to the full top-level hierarchy for the terminology.
- Searches are remembered for each session; to go forward or back use the arrow buttons.
- Tree Node Controls
- If a target code has children, toggle display of those children with the arrowhead button preceding the target code.
- If a target code does not have children, it is a leaf node and a leaf icon will appear.
- If a target code has additional information (e.g. inclusions, exclusions), toggle display of that information with the blue information icon.
- If a target code is valid for assignment, assign this entry to the current entry (see #2, #8).
- Information Panel: Displays any relevant information for this target code. Depending on the target terminology, may contain clickable links to other target codes or code ranges. Clicking these links will perform a new search based on the linked content.
- Search Tools
- An example of a search for "cholera" performed in the Terminology Browser for ICD10 is shown below.
Finishing assigned work from the dashboard
When viewing assigned work with the Editing filter applied, a new option appears to finish work for either (1) individual concepts or (2) all currently assigned concepts presently in editing.
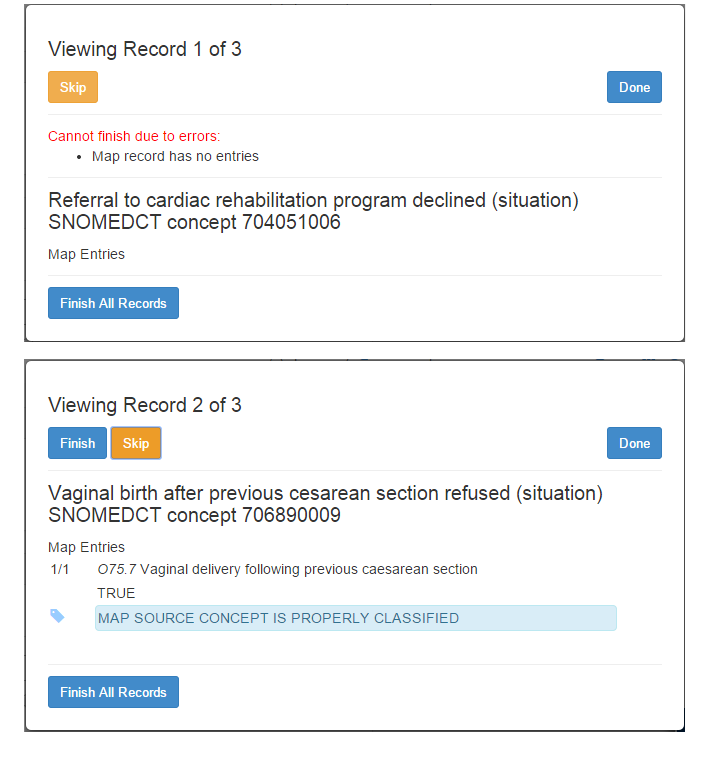
Clicking either button will display a modal pop-up window displaying a summary of the record and results of record validation:
- If the record cannot be validated successfully, the reasons for validation failure will be displayed and an orange "Skip" button will be shown. See the first example below.
- If the record is successfully validated, a blue "Finish" button will be shown. See the second example below.
- Clicking "Finish All" will attempt to validate all records currently in editing, but will only successfully finish work on those records that fail validation.
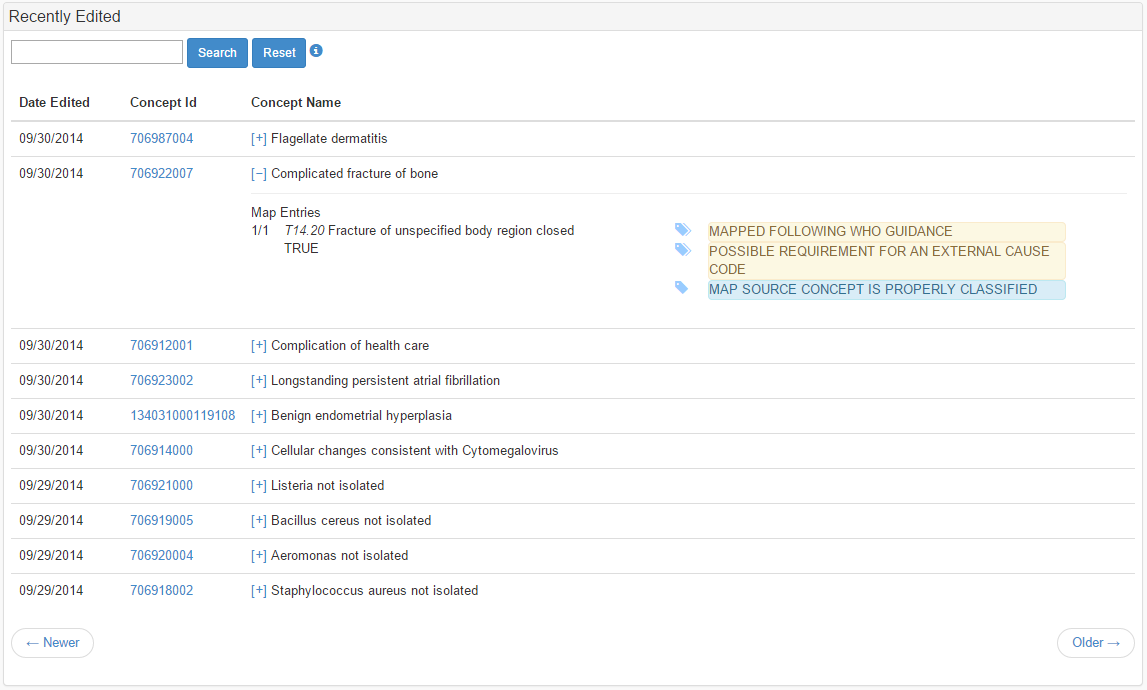
Recently edited work
To view recently edited work, go to the Recently Edited Widget on the main dashboard.
- Enter search text and click Search to retrieve results OR leave the search field blank to retrieve all work
- To clear the search, click Reset.
- To view details of a previously edited record, click the [+] link next to the concept's name.
- To go further back into history, click the Older button. Move forward in history by clicking the Newer button.
An example of retrieved edited work is shown below, with one record's summary expanded.
Feedback
From the Main Dashboard, this widget displays feedback and conversation status for mapping work.
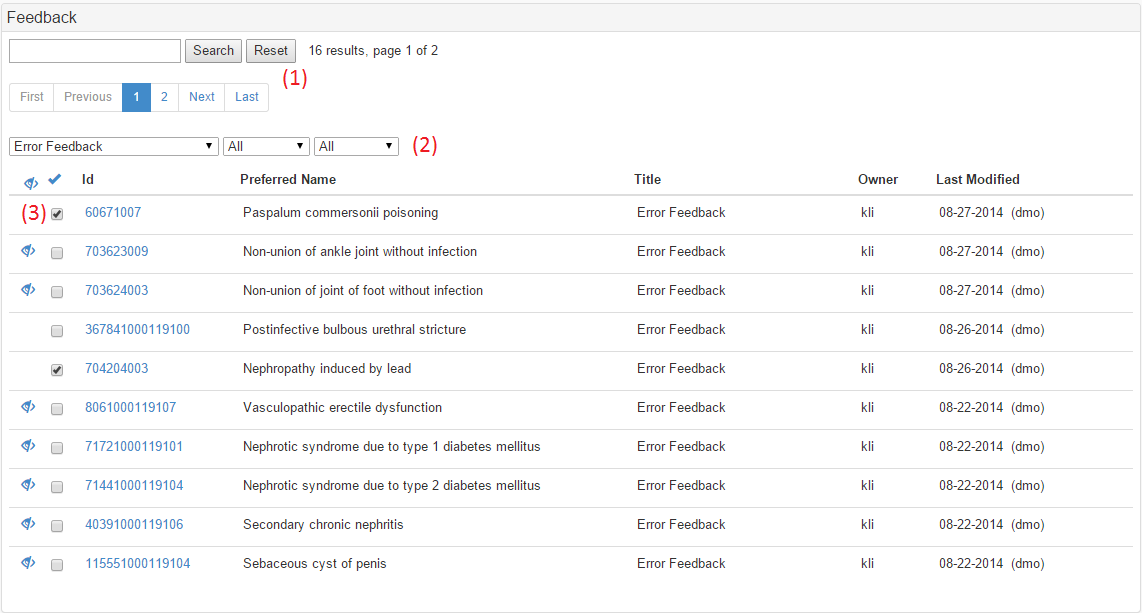
The main components of the Feedback widget, as labeled on the screenshot, are:
- The search and pagination controls.
- The filter controls. You may filter by:
- Feedback Type (e.g. Specialist Feedback, Error Feedback)
- Viewed/Unviewed status
- Resolved/Unresolved status
- The feedback list, comprised of a table with the following columns:
- Viewed status: If this feedback has not yet been viewed, a crossed-out eye icon will appear
- Resolved status: If this feedback conversation has not yet been resolved, the checkbox will be unchecked. To mark a conversation resolved, click the checkbox.
- The concept's terminology id. Click this link to view the entire conversation surrounding this concept's mapping.
- The concept's preferred term.
- The feedback's title, identical to the Feedback Type
- The owner of the map record in question
- The time of the last addition to the conversation, with the user name of the user leaving feedback.
Feedback Conversations
Accessed from the Feedback widget, this feature displays the full history of a conversation surrounding mapping a concept.

The main components of the Feedback Conversations widget are, as labeled in the screenshot:
- A summary of the map record being discussed..
- The comments left by individuals participating in the conversation.
- The rich text editor where new comments can be edited. See Map Record Notes for further details on this editor.
- The recipients list
- Displays the number of recipients who will receive the new feedback.
- To add or remove users from the list, click the drop-down and select or deselect the desired recipients
- The general controls
- Mapped Concept View: Opens the Concept Records page displaying all mappings for all viewable projects for this concept, including historical mappings.
- SNOMEDCT Browser: Only displayed if the source terminology is SNOMEDCT. Opens the SNOMEDCT Browser for this record's concept.
- Index Viewer: Only displayed if an index viewer is available for this project's destination terminology. Opens the index viewer for this project's destination terminology.
- Mark unviewed: Check/uncheck this box to change the viewed status of this conversation.
- Mark resolved: Check/uncheck to change the resolved status of this conversation.
- Send Feedback: Click to submit the contents of the text editor as a new comment on this conversation.
Index Viewer
This feature provides access to any indexes available for a project's target terminology. These indexes aide the mapper in finding a target id for a mapping given some search terms. This feature is accessible from the book icon on the Map Records dashboard if the project has indexes available. See below. It is also available from the Feedback Conversation Dashboard and the Map Project widget.

Upon opening, the Index Viewer will appear in a separate browser tab from the Mapping Tool. Displayed are the indexes for ICD10.

Searches
Searches can be performed by typing text strings into the various search fields, followed by clicking on the 'Go' button.
Contextualized Term Searches
Searches begin by entering words intended to match the main terms of the index files. In the example below, "diabetes" is the initial main term search. To search within the main term results, the second search box can be populated. In this example, the sub-search term "pregnancy" is used. And finally, a sub-sub term search can be performed within the results of the first two fields. In this example, "fetus" is used.

The first search box (1) searches only the main term level, the sub search box (2) to only the term level immediately below the main term level, and the sub-sub search box (3) to only the term level immediately below that one.
Special Searches
If you want to search by code instead of by term, the field prefix "code" can be used as in the example below, with the search "code:O03.9". Note, the same restrictions on the "level" of the search described above apply here too.

If you want to find search results that are known to start with a particular word, you can use the field prefix "s" as in the example below, with the search "s:diabetes". If you try searching just "diabetes" you will note there are a many more results spread across the various lettered tabs.

When clicking on a linked entry in one of the tabs, it attempts to construct a matching search to find the corresponding results. Note - due to inconsistencies in the representation and other data quality issues it is not always possible to find a matching entry. And in some cases, the linked strings have more than three parts and the search only supports three parts. In these cases an appropriate notification message will be displayed. Use this feature where appropriate but realize that it may require additional manual intervention.

References/Links
- n/a