Overview
Documentation on application features for leads.
Lead Features
These features are available to specialists in addition to the Specialist Features.
Finding available work
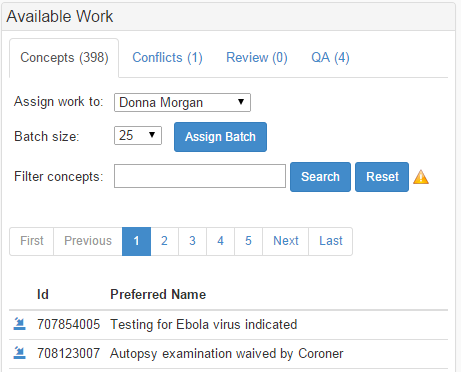
From the lead dashboard, the features supports finding content that needs to be worked according to one of four tabs:
- Concepts - in scope unmapped work
- Conflicts - specialist concepts in conflict not yet assigned
- Review - concepts on a review path not yet assigned
- QA - failed QA checks that have not yet been reviewed
The list of available work can be searched/filtered or paged through. Assigning work is done by clicking at the "Claim" icon to the left of each entry. Batches of up to 100 concepts can also be claimed by using the "Claim Batch" button. As a lead, work can also be assigned to another user using the "Assign work to" picklist.
Assigning work
Assigned work fits into the same four categories as available work for a specialist. Once assigned work can be edited by clicking on the icon to the left of each entry. Clicking on the icon to the right will return work back to the pool for assignment. Concepts can also be searched/filtered and paged from this view. There are four radio buttons for seeing assigned work in different stages of the LEADs workflow
- All - all assigned work of this type
- New - assigned work that has not yet been started
- Editing - assigned work that is still being edited
- Finished - assigned work that is done but has not yet been submitted for the next workflow review.
There is also a "by user" tab that allows the lead to see work assigned to individual SPECIALISTs or other LEADs.

Editing assigned concepts and QA work
Exactly the same as documented in Specialist Features.
Resolving conflicts
To edit a conflict, click on the assign button to the left of the concept id in the assigned work list. You will be redirected to a multipanel page (shown below) with two major components:

The Compare Map Records widget, shown as (A) in the diagram, consists of the following components:
- First specialist's record. Displays a summary of the mapping created by the first specialist.
- A "Start Here" button. Clicking this to copy the contents of this record into the lead's resolution record for modification and/or acceptance.
- Individual feedback for first specialist. To send feedback:
- Enter any desired feedback comments
- Select an error type from the drop-down list (e.g. Invalid Target, Map Advice Improperly Applied). Note that the button text will change from "Submit Feedback" to "Submit Error". When indicating an error, the comment text section can be left blank.
- Click "Submit Feedback" (or "Submit Error") to send the feedback to the specialist and start a new conversation.
- Second specialist's record and controls. The "Start Here" button and Individual Feedback components work in the same way as described in #2 and #3.
- Group feedback. Use this to send feedback to both specialists, or to include other users on the project in a conversation regarding this concept's mapping.
- Select one or more recipients from this list by expanding the drop-down list and clicking on desired recipients.
- Enter group feedback text.
- If this should be flagged specifically for Discrepancy Review, click the "Mark for Discrepancy Review" checkbox.
- Click Submit Feedback to start the conversation.
- Conflict Report: Shows the reasons why the two specialist records are in conflict.
- Errors are shown in red; warnings are shown in yellow.
- If the specified reasons for a conflict are not actually valid, click "Mark as Not in Conflict" to ensure this particular concept will not be counted for error/conflict reporting reports that may exist. This can be undone by clicking the "Unmark" button that will now display, as shown:

The Lead's Resolution Record, shown as (B) in the diagram, consists of an editing environment exactly identical to that described in Specialist Features. The lead can either copy a specialist's work for acceptance or modification, or start from scratch with a blank record. The record can be saved and finished normally, but publication requires action from the main dashboard, described in Publishing finished work.
Editing assigned review work
To review completed work, click on the assign button to the left of the concept id in the assigned Review list. You will be redirected to a multipanel environment similar to that described in Resolving a conflict.
Depending on which workflow path the completed work follows, the display may change slightly:
- For some workflow paths (e.g. the Fix Error Workflow Path), the second record for comparison will be a previously publication-ready record. The Conflict Report section will be displayed, but there may be no differences between the records.
For some workflow paths (e.g. the Review Project Workflow Path), there is no second record for comparison The second record panel will be blank, and the Conflict Report section will not be displayed, as shown below.
As with conflict resolution, the Lead Review Resolution record is contained in the standard map record editing widgets and panels. The lead can choose to copy the specialist's work into their resolution record with the "Start Here" button, or start mapping from scratch in a blank record.
Publishing finished work
Unlike specialists, to formally finish work and send maps to publication-ready status, an additional step is required from the Main Dashboard. To publish content, go to the tab corresponding to the desired type of work (Conflicts, Review, or QA), and select the "Resolved" radio button. Two types of button appear, marked in the screenshot below.
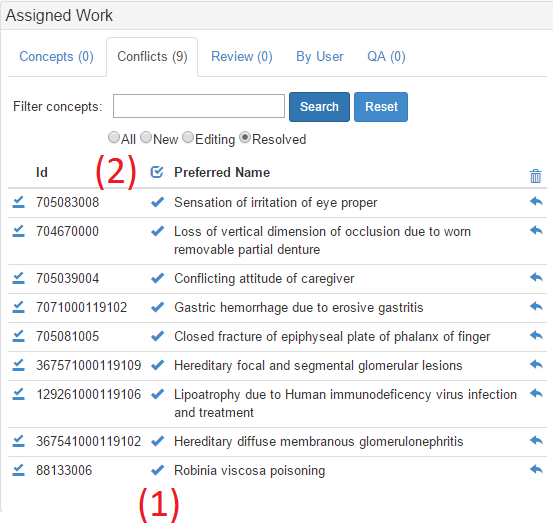
The two types of buttons are:
- The simple check box. Click this to publish an individual record.
- The checked checkbox. Click this to publish all resolved records
Clicking either button will display a modal (shown below) displaying map record summaries with the options to "Publish" or "Skip" individual records. To publish all eligible records, simply click "Publish All".

Once publication is complete, click "Done" to close the modal. The map records published will no longer be in the workflow, and can now be retrieved via the Project and Concept Records pages.
Recently edited work
Exactly the same as documented in Specialist Features.
Feedback
Exactly the same as documented in Specialist Features.
Project reports
Project reports are accessed from the Reports Widget on the Main Dashboard. On first loading the tool, the widget displays as shown:

where the initial components are:
- A drop-down list to select a type of report. Click Reset to clear the selection.
- A paged list, sorted by date, of all the reports that currently exist for this project (and definition, if selected). Clicking on these links will display the report on the right side of the panel.
Displaying reports
Clicking on a report will display the report's results on the right side of the panel:

where the labeled components are:
- Report information, showing the report type, the date the report was created, and which user created the report. If the report was run automatically, the text "Auto-generated" appears.
- Report results, always structured as:
- Count – the number of items for this value
- Value – a report-specific string which can range from a simple value (e.g. user name, date range) to much more complex information. This is determined by the report type.
- Export button. Clicking this button produces an Excel-formatted spreadsheet.
Generating and deleting reports
When a report type is selected, two new functions appear, as shown below:
- A "Generate" button. Clicking this will calculate a new report of the selected type and add it to the displayed list for viewing.
- If any of the reports appearing in the list are owned by the currently logged-in lead, an "x" will be displayed. Clicking this will delete the report. Leads cannot delete reports created automatically or by other leads; only administrators have that capability.

QA checks
QA checks are a specialized form of reports that allow existing maps to be re-inserted into the workflow on the QA Workflow Path. The basic mechanisms are the same as described in the Project Reports section. Note that QA checks are created on demand, and no list of previously created QA checks is displayed.

To generate a QA report, select a QA Check Definition from the drop-down list and click "Generate". The reports will display on the right-hand side of the panel, as shown:
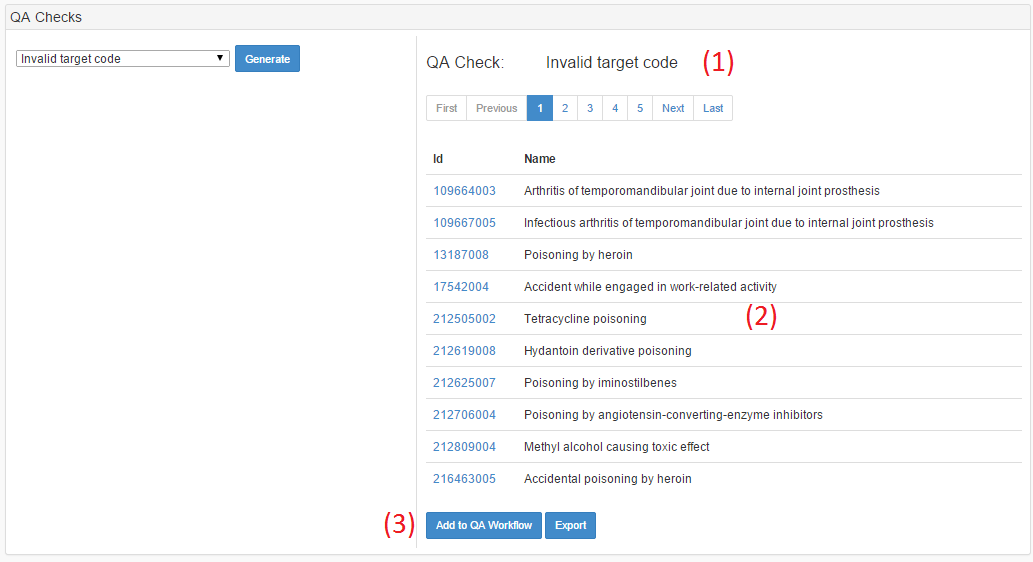
where the displayed components are:
- The name of the QA check generated.
- The paged/sorted list of mapped concepts that meet the specified QA criteria.
- The QA controls:
- To insert these concepts back into the workflow along the QA Workflow Path, click "Add to QA Workflow". These concepts will be available to all Specialists and Leads on this project.
- To export the results of this QA Check (as described in Project Reports), click "Export".
Editing map project metadata
Leads have the ability to modify some metadata for map projects. To edit metadata, click on the Project Details button on the Map Projects widget from the Main Dashboard.

The Project Details page will display the various types of metadata specified for map projects:

where the labeled components are:
- Accordions for each type of metadata attached to a project. These are initially collapsed, and can be expanded by clicking on them.
- An example of an expanded accordion, here Map Advices.
- A Notepad icon which, when clicked, enables editing.
To edit project metadata, click the Notepad icon. The display will change to add functionality, as shown below. While the Map Advice metadata is used as an example, the basic functionality is the same across all widgets.
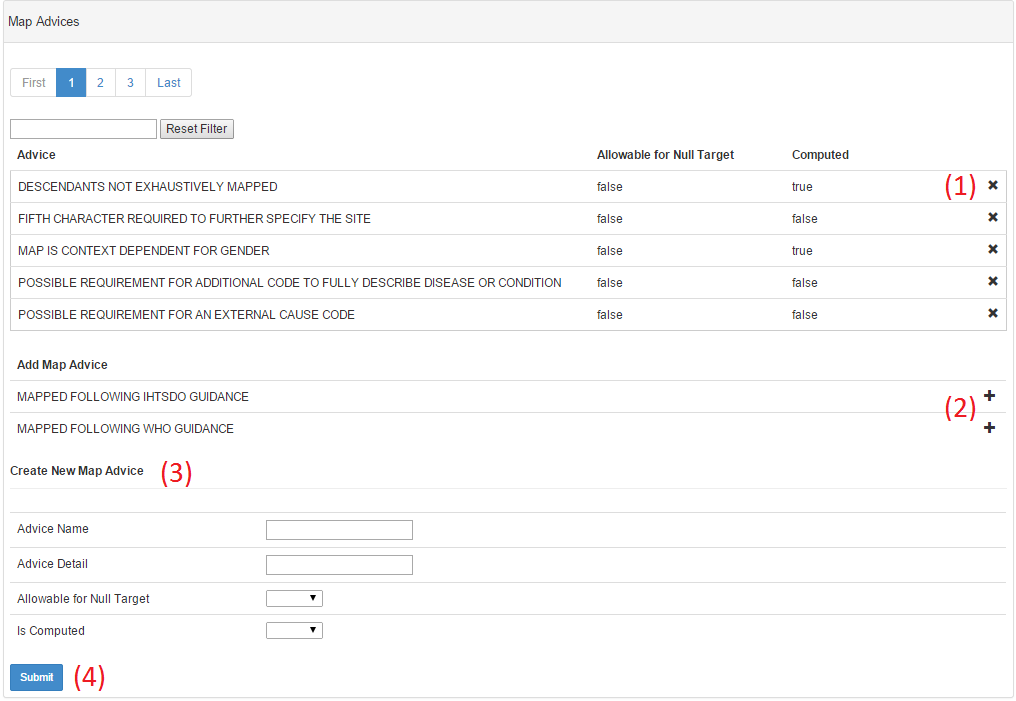
where the labeled components are:
- Delete Element – Click this "x" icon to remove a metadata element from a map project (here, removing a Map Advice).
- Add Element – Click this "+" icon to add an existing metadata element to this map project (here, adding a Map Advice).
- Create Element – Use this form to define a new metadata element (here, defining a Map Advice). The elements a Lead can edit are:
- Map Advices
- Map Relations
- Map Principles
- Preset Age Ranges
- Error Messages
- Scope Concepts
- Scope Excluded Concepts
- Submit Element – Click the "Submit" to add a new metadata element (here, a Map Advice) to the global set of Map Advices. The new element will appear in the list under "Add Map Advice", and must be formally added to the project as described in #2.