...
- Source Concept Details Panel
- Displays the source terminology, concept id, and concept name.
- If the source terminology is SNOMEDCT, a blue information icon is displayed. Clicking this opens the SNOMEDCT Concept Browser
- Map Group and Map Entries Panel
- Displays a summary current map entries attached to the record, sorted by group. The entry currently being edited is highlighted in green.
- To add a map group or entry, click the Add Entry/Group buttons.
- Entries and groups can be deleted by clicking the "x" icon attached to the desired element. Note that deleting a group will also delete all of its entries.
- Entries and groups can be reordered by drag-and-drop.
An example of multiple groups and entries is shown below, with the current entry highlighted in green.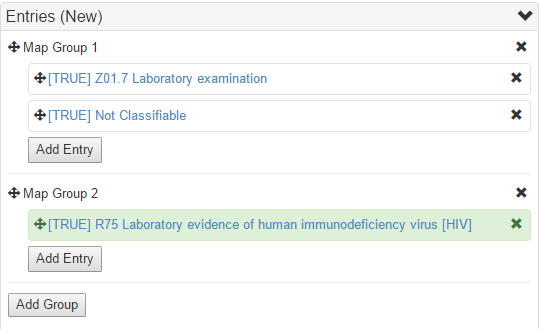
- Map Notes Panel
- Displays any notes currently attached to the record. Notes can be deleted by clicking the "x" icon on the desired note.
- To add notes to the record, enter some text into the rich text editor and click "Add Note".
- Note can be entered directly or copied and pasted from external sources such as websites or MS Word documents, with formatting preserved. This editor supports the following elements:
- Basic formatting (bold, italics, underline)
- HTML elements (e.g. <p>, <div>, anchor tags, hyperlinks)
- HTML image elements hosted on another website/server

- Map Principles Panel
- Displays any principles currently attached to the record. Principles can be deleted by clicking the "x" icon on the desired note.
- Principles can be added from the drop-down box, with displayed principles taken from the hyperlinked document.
An example of an applied principle is shown below.
- Flags Panel
- To flag a record for review, simply click the checkbox.
- The three currently supported flags are Consensus Review, Editorial Review, and Lead Review.
- Feedback Panel
- Displays any communication between the user and anyone else involved in a discussion about this record.
- To submit new Feedback to one or more leads attached to the project, enter text and click "Send Feedback".
- Feedback can be formatted in the same ways Map Notes can (see #3)
- Record Summary Widget: Displays a summary of the current state of the record as edited.
- Target Panel:
- Displays the currently selected target code and Preferred Term for the selected map entry (highlighted in green in #2)
- To change the target, enter the target code into the text box and click "Set Target".
- If the entry has no target, this must be explicitly indicated by clicking "Set Empty Target" when the text box is empty
- Mapping Parameters Panel:
- Displays the map relation, map advices, and map rule for the selected map entry (highlighted in green in #2)
- Only those parameters appropriate to the current project are displayed. For example, if the project is not rule-based, the "Rule" row and button will not appear.
- If map relations are available for this project and selected target, a drop-down menu will appear with those relations valid for assignment.
An example of an assigned relation with drop-down options is shown below.
- To set the rule (for a rule-based project), click the "Set Rule" button. A modal pop-up will prompt for the Rule Category and any required parameters. Click "Add Rule" to finish setting the rule.
An example of using the Rule Constructor to set a chronological age requirement is shown below.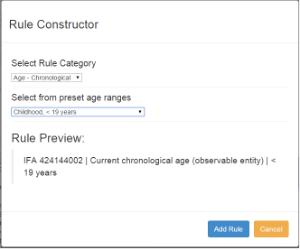
- If Map Advices are available for this project and selected target, a drop-down picklist will appear with those advices valid for assignment. Advice can be added by simply selecting the desired item in the drop-down box. Advice can be removed by clicking the "x" icon on the displayed advice values.
An example of advices attached to the entry is shown below.
- Terminology Browser Panel
- Displays a nested-tree structure representing the target terminology.
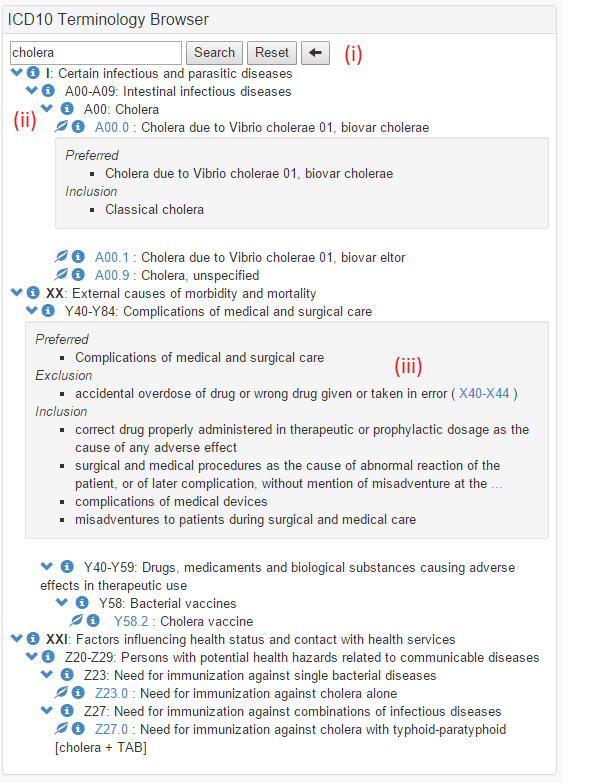
- The terminology browser has three major components, which are marked in the screenshot below.
- Search Tools
- To perform a search, enter text and hit Enter or "Search". The tree will change to reflect only those nodes (and parents) that match the search terms.
- To reset the search, hit "Reset". The tree will revert to the full top-level hierarchy for the terminology.
- Searches are remembered for each session; to go forward or back use the arrow buttons.
- Tree Node Controls
- If a target code has children, toggle display of those children with the arrowhead button preceding the target code.
- If a target code does not have children, it is a leaf node and a leaf icon will appear.
- If a target code has additional information (e.g. inclusions, exclusions), toggle display of that information with the blue information icon.
- If a target code is valid for assignment, assign this entry to the current entry (see #2, #8).
- Information Panel: Displays any relevant information for this target code. Depending on the target terminology, may contain clickable links to other target codes or code ranges. Clicking these links will perform a new search based on the linked content.
- Search Tools
- An example of a search for "cholera" performed in the Terminology Browser for ICD10 is shown below.
| Anchor |
|---|
...
|
...
|
Finishing assigned work from the dashboard
...